Showing posts with label baked goods. Show all posts

Sunday, October 7, 2012

Applesauce Cookies with Caramel Frosting!

This recipe may not be paleo but it is delicious. and addicting. and basically pure sugar...but delicious. I've made these cookies a few times before from this recipe and they've always been a big hit. Some friends of mine had a fall themed party this past Saturday and made a special request for these treats; I was happy to oblige. The ingredients for the cookies and frosting include: 

2 cups sugar
1 cup shortening (I used coconut oil instead)
2 eggs
2 cups applesauce
4 cups flour
2 tsp baking soda
2 tsp baking powder
1 tsp cinnamon
1/2 tsp cloves (I ground whole cloves in our coffee grinder)
6 tbsp butter
1/2 cup heavy cream
1 cup brown sugar
2 tsp vanilla
2 cups powdered sugar


I told you it was sugar baked on sugar mixed with sugar!

From here it's basically a muffin recipe that you drop onto a cookie sheet. These "cookies" are really apple muffin tops. Mix the dry ingredients together...


Mix the wet ingredients together (yes, it looks like baby food)...


Mix the dry into the wet...


And drop onto a parchment paper lined baking sheet. Have I mentioned before how much I LOVE parchment paper? It's genius. It results in cookies that are brown but not burnt on the bottom and baking sheets that don't need to be cleaned after baking. Amazeballs. 

The recipe calls for "small" spoonfuls to be put in the sheet, but who likes tiny cookies? I make muffin-top-monster-cookies. Bake at 375 for nine minutes.


One thing to note - this recipe makes a lot of cookies. And by a lot, I mean 45+. Yes, 45+ giant monster cookies. If you do not want 45+ giant monster cookies, I'd halve the recipe if I were you.


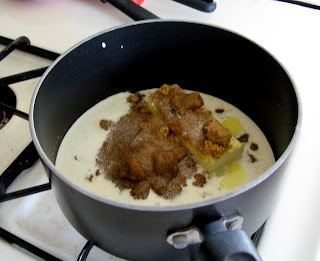
The caramel frosting is pretty much what makes these cookies. Unfortunately, it involves a lot of fast work with super hot sugar so I only got a picture of the beginning of the process: melting the 6 tbsp butter (3/4 of a stick), 1 cup brown sugar, and 1/2 cup heavy cream. Melt, stirring occasionally, until it's well incorporated. Drop in some vanilla and stir in the powdered sugar. I have a lot of trouble figuring out the powdered sugar deal - the recipe says to wait for the brown sugar mixture to cool first, but when it cools it becomes too think to stir in the powdered sugar. So, I tried adding the powdered sugar when it was hot and the powdered sugar just lumped together. No one seemed to care much since sugar melted into sugar can't be wrong.


No finished product picture but they are pretty much what the original recipe link shows them to look like.

Sunday, December 11, 2011

Brie and Apple Tarts!

I honestly thought I had finished baking with apples until next fall, but then I found this recipe while browsing Pinterest one evening. OMG, these are delicious.

Things began neat and orderly. I defrosted my puff pastry and started cutting my green apple.


Things quickly escalated into a gigantic mess. Thank god for my newly sewn apron!


 This was my first time working with puff pastry. I was pretty nervous at the onset because puff pastry has a reputation for being delicate and temperamental; but I really had no problems at all. As long as it fully thaws before you try to unwrap it, you should be all set. If it isn't fully thawed, it may crack and then you'll have a crack through all of your puff pastry layers with no way to repair them. Also: flour. Flour is important with puff pastry. When it eventually did thaw (about 40 minutes after taking it out of the fridge), the pastry got very, very tacky. 


Once I floured, rolled, and cut the puff pastry, I loaded it up with green apple slices, chunks of brie, brown sugar, butter, and cinnamon. 


Then, fold up the puff pastry around the filling and brush it with an egg wash. This. got. messy. Real messy. 


Once lined on the baking pan, bake at 400 degrees for 20 minutes. They turned out amazing. The puff pastry was flaky and golden brown, the cheese was completely melted and gooey, and the brown sugar and cinnamon cut through the bite of the green apple.  They made a really great snack and looking back on it, they were pretty easy to make...I mean...I could fill these with anything. Blueberries and bananas? Chocolate chips and bananas? All sorts of cheeses? delicious. delicious. delicious.


Thursday, June 16, 2011

Epicurious.com

A co-worker of mine just bought an i-pad, on which, he had an app which I had never heard of: Epicurious. Apparently, this is a well-known recipe/foodie webpage which had somehow escaped my knowledge of the interwebs. I've had a lot of fun searching its archives and finding new recipes.

Recently we've tried two recipes from Epicurious: Glazed Grilled Salmon and Blueberry Lemon Corn Muffins.

The salmon was challenging. Unfortunately, one downside of our apartment is that we have no yard-space, which means, no grill. We LOVE grilled food, especially in the summer months. We can't even use a stove-top griddle because our burners are varying sizes and not a single one is level. In a desperate attempt to re-capture our previous summer's diets, we decided to try salmon in a pan. At first everything looked great..

But then we quickly learned that the eat was too high and the glaze burned beyond belief. With some heat adjustment, we were able to flip the fish and get the other side cooked to perfection : )


We quickly steamed some frozen brussel sprouts and ended up with a delicious meal.

The Blueberry Lemon Corn Muffins are a new favorite of mine. Straight to the top of the list! I adore these muffins and their perfect combination of sweet, tart, and savory from the blueberries, lemon zest, and cornmeal. They were very easy and cooked to perfection.


We also lucked out and bought some super delicious blueberries.

YUM!

Monday, May 16, 2011

Secondhand Wonders

For as long as I can remember, I have been surrounded by secondhand wonders. Every Saturday morning my mom would (and still does) wake up early and hit the yard-sales, furnishing our house, our toys, and our wardrobes with treasures from another person's past. While this was sometimes frustrating as a teenager as the clothes or the accessories are never exactly what one wants, as an adult I am happy that I have been raised to care less about labels and prices and more about saving money for more rewarding things, meeting neighbors, and finding a good deal.

When I moved to JP I knew that there would be a ton of yard-sales around; but as I jumped from room to room in what I considered to be other people's apartment's, I never felt like acquiring many "things" since my housing was only temporary. Now that Simon and I live together my bargain-hunting gene has set its roots. I really enjoy walking around on sunny Saturday mornings to see what sort of gems I find. Below are some of my recent favorites:


This beautiful 70s dress came from the SOWA vintage market in Boston's South End. Other than some buttoned straps which needed to be shortened (easy), it fits like a glove!


The fantastic oven mitt comes from a JP yard-sale and the super-sturdy cutting board from a local thrift store.

Buttons! Lots of them! Another great yard-sale find which my mom bought for me; and they make for pretty decor in the apartment.


Recipes are a kind of secondhand item, right? We obtain them from others who have used them before us. This recipe for rhubarb streusel muffins is another Smitten Kitchen winner. They were SO easy and they taste SO good. I recommend them to everyone.

Monday, January 31, 2011

Little Hens and Chocolate Birthdays

As previously blogged, Simon and I like to roast the occasional chicken. Unfortunately, when we were shopping the other night, the supermarket did not have chickens! Soooo.....we took our chances with Cornish Game Hens! oooOOOooo fancy! To be honest, they were exactly like little chickens...


They turned out pretty cute, and were certainly pretty tasty.


The best part of the dinner, however, was the asparagus, a new favorite quick and easy veg. All we did was put some butter and chopped garlic in a pan, threw in the asparagus, and sauteed it all on medium-high heat for about ten minutes until they turned nice and tender (also delicious). Seriously, that's it; just cut up come garlic and throw it in a pan with some butter and the stalks!


On a less savory note, we've been living in a state of chocolate comatose recently. Simon's birthday was last Wednesday and his co-worker, another crafty Laura who enjoys delicious desserts, made him a wonderful chocolate trifle. I devoured the portion he brought home and then incessantly nagged Simon until he got the recipe from her : )


Ingredients include devil's food cake, instant chocolate pudding, cool whip, sliced strawberries, and heath bars (not pictured). Just like the asparagus this was all super easy. Simply layer everything together in a cake, pudding, strawberry, coolwhip sequence, and top it off with chopped heath bars.


Here's the catch...the original trifle-making-Laura made hers for 8 people...I used the same amount of ingredients for 2. Yes, 2. You read that correctly, I filled a 4 quart (!) pyrex bowl to the brim with chocolatey goodness, and we could not be happier!

Saturday, January 1, 2011

A Series of (Delicious) Mistakes

A while back...say...before Thanksgiving (!)...I decided I wanted to make these Pumpkin Cookies from the blog Let's Dish. Needless to say, I became so absorbed in surviving the end of my semester that the cookies were put on hold. Also, I was completely unable to find canned pumpkin...no matter how many stores I tried I just couldn't find it anywhere. That said, the heavy cream I bought for the recipe expires on 1/2/11 so it was either make them tonight or probably never make them at all. I didn't want to stand in the kitchen all night, so I decided to make a mess of our living room floor in front of our TV, this was most certainly my first mistake...

I was distracted. I didn't have all the ingredients I needed. I made substitutions, screwed up my measurements, and did not pay attention to the directions. I used pumpkin pie mix instead of canned pumpkin, half of my butter was actually margarine, and somehow I only added one cup of flour instead of two; it was sort of a cookie free-for-all, but the dough tasted good so I went ahead with the baking.


The cookies flattened out and turned into pumpkin flavored, very crumbly, pancakes - but delicious pumpkin flavored, very crumbly, pancakes.

It was then time to make the icing! Even after noting all the mistakes I made with the cookies, I still did not have enough willpower to focus on the directions for the icing, and yes, I screwed up again.

The recipe instructs the baker to let the boiling heavy cream, brown sugar, and butter cool before adding the powdered sugar. I did not. I threw that fluffy goodness directly into the boiling gooey goodness. The result was interesting. The powdered sugar mixed in a bit, and then remained in small little undissolvable balls. They look a little funny, but they make for tiny little powdered sugar pockets that are actually quite delicious in the icing.


All in all the series of mistakes made for some odd, but delicious cookies. A recipe that withstands my inattention must be extraordinary when made correctly.

Saturday, December 18, 2010

Part 3: Sugar Cookies!

Before Simon and I were destroyed by the stomach flue this week, we completed the third and final chapter of our Christmas spectacular adventures. Alton Brown supplied us with this recipe via the wonderful ways of the internet.

It's pretty basic; make a wet bowl and a dry bowl, then slowly add the dry to the wet, stirring often:


keep stirring until it makes a nice little ball...or pick it up in your hands and squish it into a ball when you get tired of stirring...
Once in a ball, cover with plastic and put in the fridge for about 2 hours. What I really like about this recipe is that Alton Brown suggests rolling the dough in powdered sugar instead of flour. It worked really well and added a nice, light sugar taste to the cookie instead of that unpleasant flour taste.


Roll it out to about 1/4 inch, cut, and decorate!

Sadly, this is where disaster struck. Sugar cookies only cook for about 9 minutes...TOPS. What only cooks for 9 minutes? It is too easy to forget about something cooking for only 9 minutes! So...we forgot...and half of them burned. The other half, however, were delicious.


And yes, I know, we are not the world's best decorators. It was fun, however, and we enjoyed playing with the frosting!

Tuesday, December 14, 2010

Peppermint Bark!!

Christmas Spectacular part 2!

We made peppermint bark using this recipe! This has to be the simplest cookie/holiday treat ever. All I needed was brown chocolate (I used some chocolate chips that we use in pancakes), white chocolate, vegetable oil, peppermint extract, and some silicone ice cube trays in the shapes of stars....stars are christmas-y, right?

oh, and also some crushed candy canes. The recipe suggests using a meat tenderizer. Since I do not have a meat tenderizer, I used a hammer..bang bang!

First step is to add some vegetable oil to the brown chocolate, melt it, and then add half of the peppermint extract. Then, stir, pour, and add candy canes. Put in the fridge for about half an hour or until they are nice and solid.

I was a little nervous about the white chocolate. Sometimes white chocolate can taste funny and people don't usually like it as much as brown chocolate, but this candy melts white chocolate tasted delicious.

Repeat the brown chocolate process with the white chocolate, and put it back in the fridge:


Half an hour later, pop them out and yummmmmmm!

I intend to make some more and bring them to my office holiday party next Monday :)

Friday, September 17, 2010

Larger Magnets and Blueberry Deliciousness

Just a few quick projects to post about today. Expect a large post sometime next week on my new sewing machine! Lauren is coming over on Sunday to check it all out and show me what's what.

Once Simon and I settled into our new place, the magnets I made looked super tiny, albeit adorable, on our big, white, empty fridge door. So I ordered some larger buttons and used the same process to make some larger fridge magnets. I've included two of the previous ones for scale:


In an attempt to cook more, eat out less, and eat healthier, I made Simon and I some blueberry muffins using this recipe from Smitten Kitchen. I'm not going to re-type the recipe because I strictly stayed on her recipe.


I must admit, adding the lemon zest and using plain yogurt turned out wonderfully.

Friday, January 2, 2009

Cinnamon Snaps!


These cinnamon snaps come from Didi Emmons' cookbook, Vegetarian Planet

the ingredients are:
2 cups unbleached flower
1 1/2 teaspoons baking soda
1/2 teaspoon salt
3-4 teaspoons ground cinnamon (i used closer to 3)
1 teaspoon ground allspice
3/4 cup unsalted butter, softened
1/2 cup plus 1/3 cup white sugar
1/2 cup plus 3 tablespoons dark brown sugar
1 egg

the recipe involves a wet bowl and a dry bowl. above is the wet bowl, it has the butter, beaten, the 1/2 cup sugar, brown sugar, and the egg. at first it looked like too small of an amount, and frankly it looked like dog food. but it smells and tastes delicious. mixing these ingredients together was probably the most difficult part in the whole process. without a mixer it seems as though the butter will never soften, but it does...with work and dedication.

the dry bowl includes the flour, baking soda, salt, cinnamon and allspice. this part is easy.

mix the two bowls together, slowly pouring the dry mixture into the wet and mixing it a bit at a time. again, tedious, but fairly easy. i pounded this into a large ball, put it in a bowl, covered it in plastic wrap and let it chill in the fridge for at least 30 minutes. it still looks like very little dough for 24 cookies, but i went with it anyway. once it's chilled, roll 24 little balls, roll them in the left over white sugar, place them on cookie sheets (widely spaced apart...this is important because they EXPAND like crazy), so i used two cookie sheets, and press them down lightly.

they look quite beautiful actually.

bake them at 350 degrees. the recipe says 6-8 minutes, but i kept them in there for much longer, i don't think my oven gets hot enough. just keep an eye on them and it's easy to tell when they are done.

they were super yummy and a big hit at the party i took them to. they get really big and filling so don't worry about the small amount of dough it makes. they are thin but have a nice crisp to them without being so hard that you feel like you're going to break your teeth.