So I sort of failed when it came to documenting the process of making these stockings. In fact, I documented none of it. All I have to show for myself are these three photos:
Cutting pieces:
Pieces cut:
Finished product:
They turned out really, really well. I'm super happy with them. They seem sturdy and well constructed. Also, I learned about sewing curved edges which is not as difficult as I though it would be. Next year I'll add initials for the three of us: S, L, and J.
Showing posts with label diy. Show all posts
Friday, December 28, 2012
Sunday, December 9, 2012
Tree Skirt
I'm sorry that I haven't blogged since October, things have been a little crazy recently. For starters, Simon and I hosted Thanksgiving for our families this year. You can read about it here. The following weekend we had a bunch of friends over to celebrate my birthday and so everyone can see our finally put together apartment. And then THIS weekend we brought home our very own puppy. Her name is Jessie:
So while I have been doing plenty of crafting and cooking, I don't have many finished products to show you at this point in time. I did, however, just recently sewed us a Christmas tree skirt. You see, this is the first year we've been able to buy a real Christmas tree and we quickly realized it was in need of a tree skirt:
See how entirely unattractive that giant green tree stand is?
So we went out and grabbed a couple yards of fabric and Simon helped me draw and inner and outer circle and I went to work. The fabric itself was not terribly wide so our skirt isn't very large, but I think in future years I will add a few more inches of "trim" around the outside to extend it a bit.
The sewing for this was pretty simple. Most of my time was consumed with pinning the edges. It's a little tricky to get a 1/2 inch seam to be even along a curved surface, but I worked it out.
I did this for the outer edge, inner edge and the sides of the back seam (I cut a slit up the back so we could drape it around the tree stand).
Ta-dah! Pretty tree skirt:
So while I have been doing plenty of crafting and cooking, I don't have many finished products to show you at this point in time. I did, however, just recently sewed us a Christmas tree skirt. You see, this is the first year we've been able to buy a real Christmas tree and we quickly realized it was in need of a tree skirt:
See how entirely unattractive that giant green tree stand is?
So we went out and grabbed a couple yards of fabric and Simon helped me draw and inner and outer circle and I went to work. The fabric itself was not terribly wide so our skirt isn't very large, but I think in future years I will add a few more inches of "trim" around the outside to extend it a bit.
The sewing for this was pretty simple. Most of my time was consumed with pinning the edges. It's a little tricky to get a 1/2 inch seam to be even along a curved surface, but I worked it out.
I did this for the outer edge, inner edge and the sides of the back seam (I cut a slit up the back so we could drape it around the tree stand).
Ta-dah! Pretty tree skirt:
Saturday, September 22, 2012
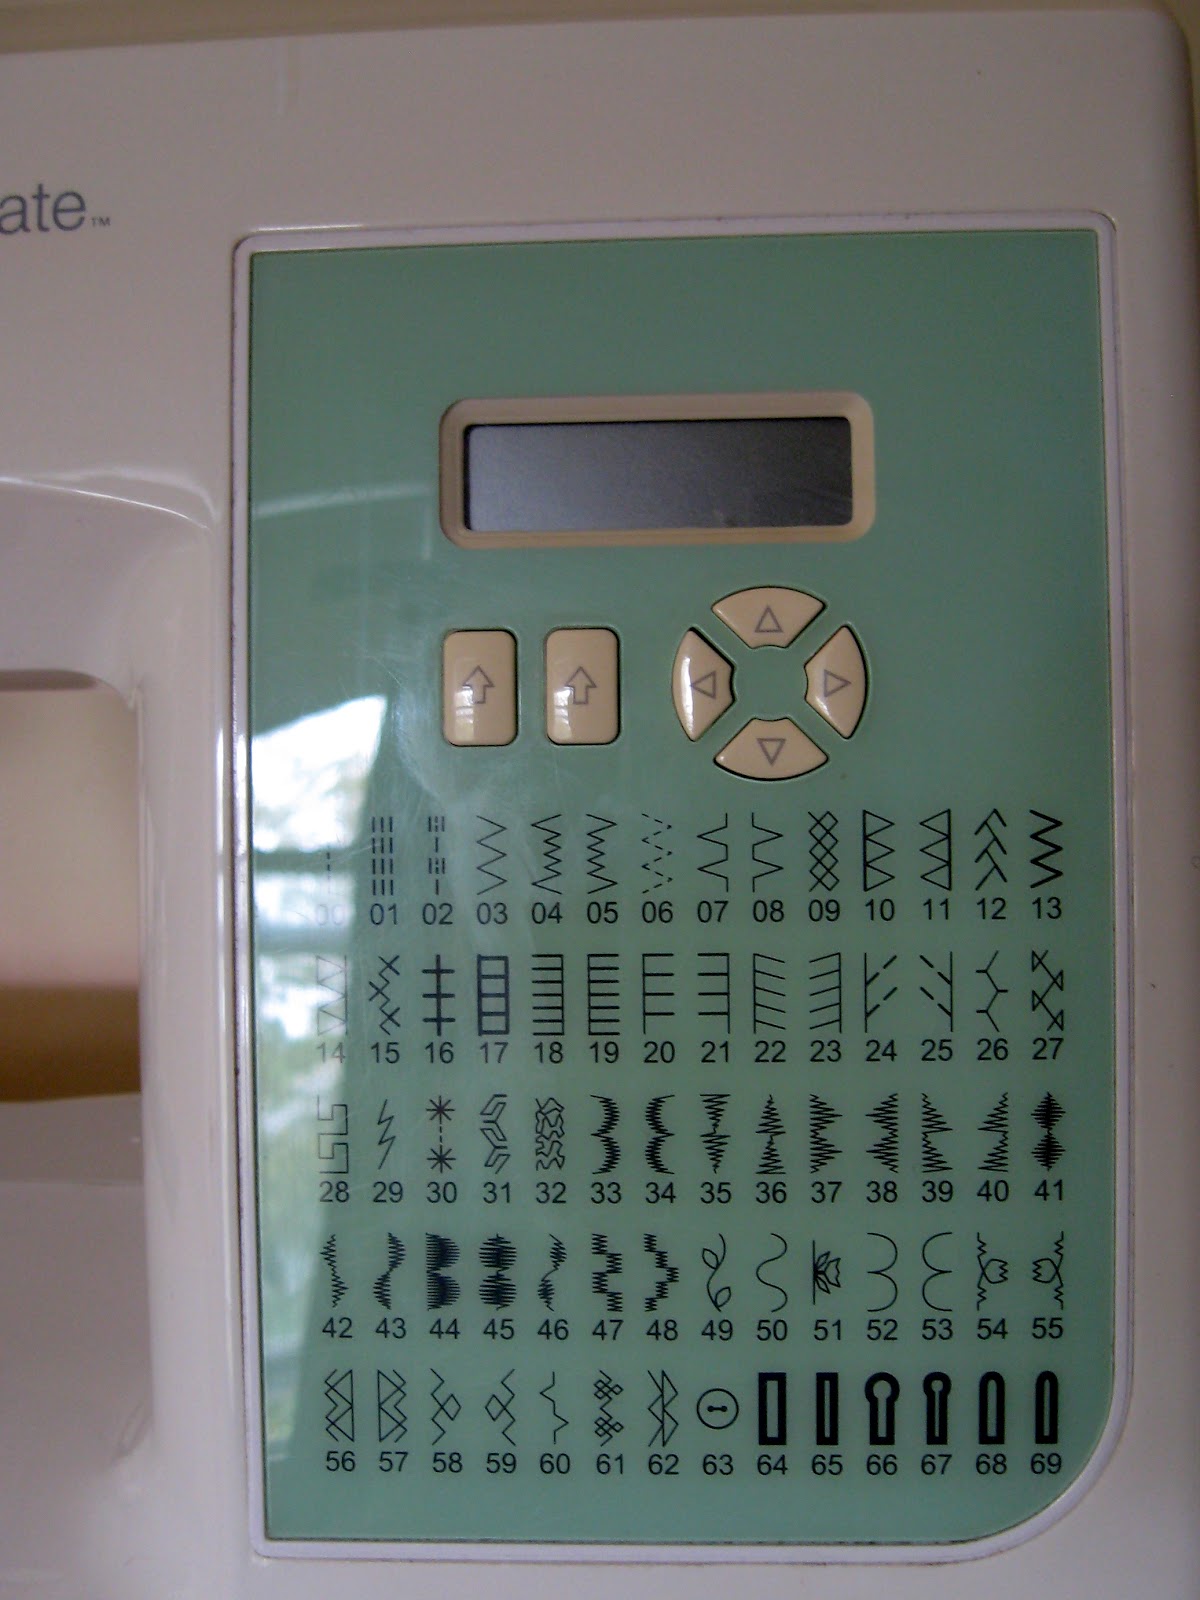
SINGER 7256 Fashion Mate
I bought a new sewing machine!
Actually, I didn't buy it. My parents gave it to me as an early birthday present. Thanks parents!
It's pretty sweet. Not only does it have a whole lot of computerized stitches, but it also as an automatic needle threader, a bunch of extra bobbins, needles, feet, buttonhole accessories, etc. And it fits great on my new sewing table in my new office. Yay new things!
I've turned it on, threaded it, used the bobbin winder, and generally fussed around with it. However, it has yet to see true needle to fabric action. I planned on using it this past weekend for just that but I got a head cold and my entire life got relegated to the couch, or the bed, or anywhere else I could close my eyes. I did manage to get to JP Knit and Stitch which was having a big fabric sale. I found this beautiful yellow and white fabric.
I'm not sure what I'll use it for, but I'm sure it will be something fabulous. Unfortunately, I bought this along with a yellow rotary cutter in a yellow box while wearing my neon yellow hoodie - everyone in the store had a big laugh at that. Normally I would have laughed along with them but it took everything I need not to sneeze on every single piece of cloth in that store.
I also made a quick trip to Winmil Fabrics in downtown Boston to buy some cheap organza for a test run of a secret wedding craft.
Actually, I didn't buy it. My parents gave it to me as an early birthday present. Thanks parents!
It's pretty sweet. Not only does it have a whole lot of computerized stitches, but it also as an automatic needle threader, a bunch of extra bobbins, needles, feet, buttonhole accessories, etc. And it fits great on my new sewing table in my new office. Yay new things!
I've turned it on, threaded it, used the bobbin winder, and generally fussed around with it. However, it has yet to see true needle to fabric action. I planned on using it this past weekend for just that but I got a head cold and my entire life got relegated to the couch, or the bed, or anywhere else I could close my eyes. I did manage to get to JP Knit and Stitch which was having a big fabric sale. I found this beautiful yellow and white fabric.
I'm not sure what I'll use it for, but I'm sure it will be something fabulous. Unfortunately, I bought this along with a yellow rotary cutter in a yellow box while wearing my neon yellow hoodie - everyone in the store had a big laugh at that. Normally I would have laughed along with them but it took everything I need not to sneeze on every single piece of cloth in that store.
I also made a quick trip to Winmil Fabrics in downtown Boston to buy some cheap organza for a test run of a secret wedding craft.
Sunday, July 22, 2012
Catching Up
I've been the worst blogger recently. I swear it's just because I've been insanely busy.
I've been doing secret wedding crafts that won't be fully revealed until after the big day:
We've been packing for our move to the new apartment in August:
Also, I've joined a gym and have been really focusing on getting myself into shape.
As any healthy person knows, you have to eat healthy in addition to exercising to make any sort of difference. So, Simon and I made a delicious dinner the other night which involved a new cooking technique - baking tofu.
I am no stranger to tofu, I ate a lot of it when I was vegetarian and Simon and I still make it every once in a while. In the past we've always marinated it and then fried the tofu in some oil (sort of defeating the whole healthy eating aspect of eating tofu). But the other night I found this recipe. I have to say, baking tofu resulted in a very nice texture. The marinade was a little salty (as the reviews state), but overall I feel as though this was a success.
We marinated the tofu over night and then set it out in a single layer in a baking pan (can you see how uneven our countertops are by the marinade pooling to one side? - awesomesauce). The tofu baked at 325 for a little under an hour, turning the tofu halfway through. I may bake it a little more next time.
With about 15 minutes left on the tofu Simon started a quick stir-fry consisting of snap peas, bell peppers, yellow squash, and onions.
Put the two together and voila! A delicious, healthy, and surprisingly filling dinner.
I'll definitely keep baking tofu. The marinade was fine, but nothing too special, so I'll probably keep looking for other options.
I've been doing secret wedding crafts that won't be fully revealed until after the big day:
We've been packing for our move to the new apartment in August:
Also, I've joined a gym and have been really focusing on getting myself into shape.
As any healthy person knows, you have to eat healthy in addition to exercising to make any sort of difference. So, Simon and I made a delicious dinner the other night which involved a new cooking technique - baking tofu.
I am no stranger to tofu, I ate a lot of it when I was vegetarian and Simon and I still make it every once in a while. In the past we've always marinated it and then fried the tofu in some oil (sort of defeating the whole healthy eating aspect of eating tofu). But the other night I found this recipe. I have to say, baking tofu resulted in a very nice texture. The marinade was a little salty (as the reviews state), but overall I feel as though this was a success.
We marinated the tofu over night and then set it out in a single layer in a baking pan (can you see how uneven our countertops are by the marinade pooling to one side? - awesomesauce). The tofu baked at 325 for a little under an hour, turning the tofu halfway through. I may bake it a little more next time.
With about 15 minutes left on the tofu Simon started a quick stir-fry consisting of snap peas, bell peppers, yellow squash, and onions.
Put the two together and voila! A delicious, healthy, and surprisingly filling dinner.
I'll definitely keep baking tofu. The marinade was fine, but nothing too special, so I'll probably keep looking for other options.
Friday, June 1, 2012
Kindle Love
Oh hey blogosphere! It's been over two and a half months since I've last visited. I promise to be more diligent in the future. The main reasons for my lack in crafting/cooking are that I've packed up my super cool but super old (and therefore frustrating to use) sewing machine and I've been having some stomach problems since March that have resulted in a not-so-interesting diet.
ANYWAY
I've pulled myself together and sewed myself a Kindle cover by hand:
Pretty, right?! The exterior fabric is from a friend of mine and the case is lined with tan and white felt to provide some cushion for the kindle. I used this pattern. As you can see I decided to only do one strap and went for adhesive velcro instead of fussing with a button.
Overall I'm pretty happy with it. I'd definitely change a few things though if I were to make another one. You can't really tell from the picture above, but the measurements didn't quite work out - no matter how much I pull, tug, and push, that kindle will still peek out of the top the tiniest bit, even when the tab is closed. Also, I'd trim the edges in addition to the corners of the lining before inserting it into the exterior fabric. The 1/2" seam allowance on the exterior fabric and the 1/2" seam allowance on the interior fabric don't lay nicely together so the edges are a little wonky (this could also be due to uneven sewing by hand).
It was easy to do and I've used it lots this past week while carrying my kindle during my daily commute.
ANYWAY
I've pulled myself together and sewed myself a Kindle cover by hand:
Pretty, right?! The exterior fabric is from a friend of mine and the case is lined with tan and white felt to provide some cushion for the kindle. I used this pattern. As you can see I decided to only do one strap and went for adhesive velcro instead of fussing with a button.
Overall I'm pretty happy with it. I'd definitely change a few things though if I were to make another one. You can't really tell from the picture above, but the measurements didn't quite work out - no matter how much I pull, tug, and push, that kindle will still peek out of the top the tiniest bit, even when the tab is closed. Also, I'd trim the edges in addition to the corners of the lining before inserting it into the exterior fabric. The 1/2" seam allowance on the exterior fabric and the 1/2" seam allowance on the interior fabric don't lay nicely together so the edges are a little wonky (this could also be due to uneven sewing by hand).
It was easy to do and I've used it lots this past week while carrying my kindle during my daily commute.
Wednesday, February 8, 2012
Flowers!
Simon has been telling me to explore new hobbies for years. I've just never really been a "hobby" person. Growing up I spent all my time singing and acting, so much so that I never really found a need to kill time. When I moved to Boston I found myself no longer performing and a little lost. I tend to justify my wasting hours away in front of the TV as "relaxing" when I am, in fact, just wasting hours in front of the TV. I have spurts of diversions like when I ran the half-marathon or when I get caught up reading for hours on end, but nothing that I would consider a "hobby" that I could just come home to and pick up if I so desired. That is, until I started experimented with making book-page flowers for the wedding...
I spent Saturday making flowers.
And by Saturday, I mean ALL DAY Saturday. The whole day. Coffee to Sleepytime tea. Here is what I have to show for it:
I was completely content keeping my hands busy, having the TV off and good music on, drinking tea and trying not to burn myself with a hot glue gun. I found following origami directions calming and zen-like. I think I have a hobby : )
Some of these tutorials I found on Pinterest, some on other websites, but I'll link to each one below the picture.
I spent Saturday making flowers.
And by Saturday, I mean ALL DAY Saturday. The whole day. Coffee to Sleepytime tea. Here is what I have to show for it:
I was completely content keeping my hands busy, having the TV off and good music on, drinking tea and trying not to burn myself with a hot glue gun. I found following origami directions calming and zen-like. I think I have a hobby : )
Some of these tutorials I found on Pinterest, some on other websites, but I'll link to each one below the picture.
3D Star (the actual tutorial is in some language I don't know...but the pictures are easy to follow)
Storybook Rose (this one is my favorite - also the most time consuming)
Saturday, January 14, 2012
Glass Etching!
Simon and I store a lot of our food in mason jars. Not only do they look good, but they do a great job keeping food fresh. I've always loved the look of labeled mason jars such as these:
or this (both images found on Pinterest):
Not too long ago I found this tutorial on how to use glass etching cream to make permanent designs on mason jars. I didn't even know glass etching cream existed. What a good idea! So I decided to do a test run on an extra mason jar we had around the kitchen. I'm really glad I did so because this is definitely a DIY that will take some practice to perfect.
First I made the stencil out of painter's tape.
The lines weren't perfect but I was happy with the overall look and fit.
Applying the etching cream was awkward and nerve-wracking. This stuff apparently destroys skin if it comes in contact. I was also using a sponge instead of a paintbrush so the application was very uneven. When all was said and done, I did not burn my skin.
I was a little uncertain about how long to keep the cream on, so I gave it 4 minutes before rinsing it off and removing the stencil.
Here's what I learned:
1) the stencil can't have any wrinkles - the etching cream will seep in to them and ruin the straight line you spent so much time making
2) the cream really needs to be applied evenly
3) the cream probably could have stayed on for a good 6 minutes to get a really nice distinct etch
I actually pretty happy with the results. They clearly aren't perfect but I have four more sides to practice on before moving to the jars we actually use!
or this (both images found on Pinterest):
Not too long ago I found this tutorial on how to use glass etching cream to make permanent designs on mason jars. I didn't even know glass etching cream existed. What a good idea! So I decided to do a test run on an extra mason jar we had around the kitchen. I'm really glad I did so because this is definitely a DIY that will take some practice to perfect.
First I made the stencil out of painter's tape.
The lines weren't perfect but I was happy with the overall look and fit.
Applying the etching cream was awkward and nerve-wracking. This stuff apparently destroys skin if it comes in contact. I was also using a sponge instead of a paintbrush so the application was very uneven. When all was said and done, I did not burn my skin.
I was a little uncertain about how long to keep the cream on, so I gave it 4 minutes before rinsing it off and removing the stencil.
Here's what I learned:
1) the stencil can't have any wrinkles - the etching cream will seep in to them and ruin the straight line you spent so much time making
2) the cream really needs to be applied evenly
3) the cream probably could have stayed on for a good 6 minutes to get a really nice distinct etch
I actually pretty happy with the results. They clearly aren't perfect but I have four more sides to practice on before moving to the jars we actually use!
Sunday, January 1, 2012
not-so-good boutineers
My mom got me the book "Handmade Weddings" for Christmas and it has some beautiful crafts and photos.
One of the projects that caught my eye were these beautiful felt boutineers:
They looked pretty simple and I couldn't see any reason not to try it with book pages. Making the buds went pretty well with some practice. I couldn't get the tight spiral since unlike felt, paper creases. The biggest difficulty occurred when I attempted to put the buds together using floral wire and floral tape. Can I just say that floral tape is really, REALLY frustrating. It's more tacky than sticky and only wants to adhere to itself. The tape kept sliding off the paper leaving the whole project looking pretty messy.
I don't think I'll be making these for the wedding. So it goes though, right? I am going to attempt to make this boutineer next, which I found on Style Me Pretty:
I will use the directions found here. Wish me luck!
One of the projects that caught my eye were these beautiful felt boutineers:
They looked pretty simple and I couldn't see any reason not to try it with book pages. Making the buds went pretty well with some practice. I couldn't get the tight spiral since unlike felt, paper creases. The biggest difficulty occurred when I attempted to put the buds together using floral wire and floral tape. Can I just say that floral tape is really, REALLY frustrating. It's more tacky than sticky and only wants to adhere to itself. The tape kept sliding off the paper leaving the whole project looking pretty messy.
I don't think I'll be making these for the wedding. So it goes though, right? I am going to attempt to make this boutineer next, which I found on Style Me Pretty:
I will use the directions found here. Wish me luck!
Thursday, December 29, 2011
The Holidays!
Like much of the nation, I love the holidays. They're a happy time when everyone is smiling and singing and telling stories about the past. One of the things I love most about the holidays are Christmas Trees and decorations. Simon and I bought our first live tree this year from Whole Foods. It stands about three feet tall and just barely fits in the corner of our living room even at that size. Over the past year or two we've collected some ornaments on different trips we've taken and as presents from relatives, but one of my absolute favorite part of ornaments are the memories that come with unpacking them each year. So, I decided to make a few of my own inspired by some I've seen around the web:
They aren't anything terribly special, one is filled with green, red, and white buttons I had in my button jar, and the other is wrapped in twine; but these two ornaments will always remind me of the very first Christmas Simon and I traveled as a family unit instead of splitting apart. I'll remember the first Christmas we had a live tree; and the last Christmas in our tiny, but wonderful, apartment. I'll think of condo hunting, starting my new job, and the fact that it was unseasonably warm and everyone was thankful for that. They will remind me that this was the year Greg, Seiko, and Britta were all in the states from abroad and how happy that made our parents and us. For just some buttons, twine, and glass, these ornaments are well worth the time and effort spent making them.
That said, I also want to put up a list of my New Year's Resolutions (which I'll hopefully stick to):
1) Get in shape. This time last year I was at the peak of my half-marathon training and had never been in better shape - I had side-abs. I want side-abs again.
2) Continue taking care of my teeth. I had to spend $1,300 this year in dental bills once my insurance maxed out. That will not happen again.
3) Drink more water. It's good for me.
4) Stop chewing on my lips. It's gross.
5) Bring lunch to work. Healthier and cheaper.
They aren't anything terribly special, one is filled with green, red, and white buttons I had in my button jar, and the other is wrapped in twine; but these two ornaments will always remind me of the very first Christmas Simon and I traveled as a family unit instead of splitting apart. I'll remember the first Christmas we had a live tree; and the last Christmas in our tiny, but wonderful, apartment. I'll think of condo hunting, starting my new job, and the fact that it was unseasonably warm and everyone was thankful for that. They will remind me that this was the year Greg, Seiko, and Britta were all in the states from abroad and how happy that made our parents and us. For just some buttons, twine, and glass, these ornaments are well worth the time and effort spent making them.
That said, I also want to put up a list of my New Year's Resolutions (which I'll hopefully stick to):
1) Get in shape. This time last year I was at the peak of my half-marathon training and had never been in better shape - I had side-abs. I want side-abs again.
2) Continue taking care of my teeth. I had to spend $1,300 this year in dental bills once my insurance maxed out. That will not happen again.
3) Drink more water. It's good for me.
4) Stop chewing on my lips. It's gross.
5) Bring lunch to work. Healthier and cheaper.
Monday, September 26, 2011
Paper Flowers: la segunda parte
I haven't been terribly crafty recently. I keep falling victim to the TV or to reading the incredibly long, and incredibly addictive, George R. R. Martin Game of Thrones series. I have managed to make some more paper flower prototypes...and this time...they're yellow!
Lauren then came up with the obvious answer: use the RIT dye I bought to dye buttons! I already have the leftover dye and I know that I like the shade of yellow it produces. <- this is why she's my MOH.
Total success. It almost became a disaster when I forgot about the fact that PAPER flowers dunked in to LIQUID dye must DISSOLVE. In my blissful ignorance I attempted to get a stronger yellow color by submerging the flowers for far too long - resulting in some frantic separating, reshaping, and flattening of the petals. I think a quick dunk would have done the trick. Or maybe numerous dunks over a longer time period with the flowers drying between treatments.
The color difference is phenomenal. I did have to use a more white book page for the yellow dye to take; but I'm super happy with the results.
Saturday, August 6, 2011
Paper Flowers
While searching the blogs I've come across a number of beautiful paper flowers, particularly ones made out of book pages. Using these tutorials, I've made some prototypes with various kinds of glue (Elmer's and hot glue) to see what holds best. I think hot glue is winning...also, hot glue is super fun to play with; and don't we want to have fun while crafting?
I won't say what these will eventually be used for, but I'm pretty sure people can guess which future event they'll be used for.
They are really simply to make. The rose is merely cutting a spiral and rolling it up. At first it looks totally wrong but if you plop it down on a table and let it settle into itself, it really becomes a beautiful bloom.
These ones are more time consuming. Each petal is an individual sheet out paper which are ultimately glued together. I really think the final product is beautiful and worth the effort.
I won't say what these will eventually be used for, but I'm pretty sure people can guess which future event they'll be used for.
They are really simply to make. The rose is merely cutting a spiral and rolling it up. At first it looks totally wrong but if you plop it down on a table and let it settle into itself, it really becomes a beautiful bloom.
These ones are more time consuming. Each petal is an individual sheet out paper which are ultimately glued together. I really think the final product is beautiful and worth the effort.
Sunday, July 17, 2011
Button Dyeing
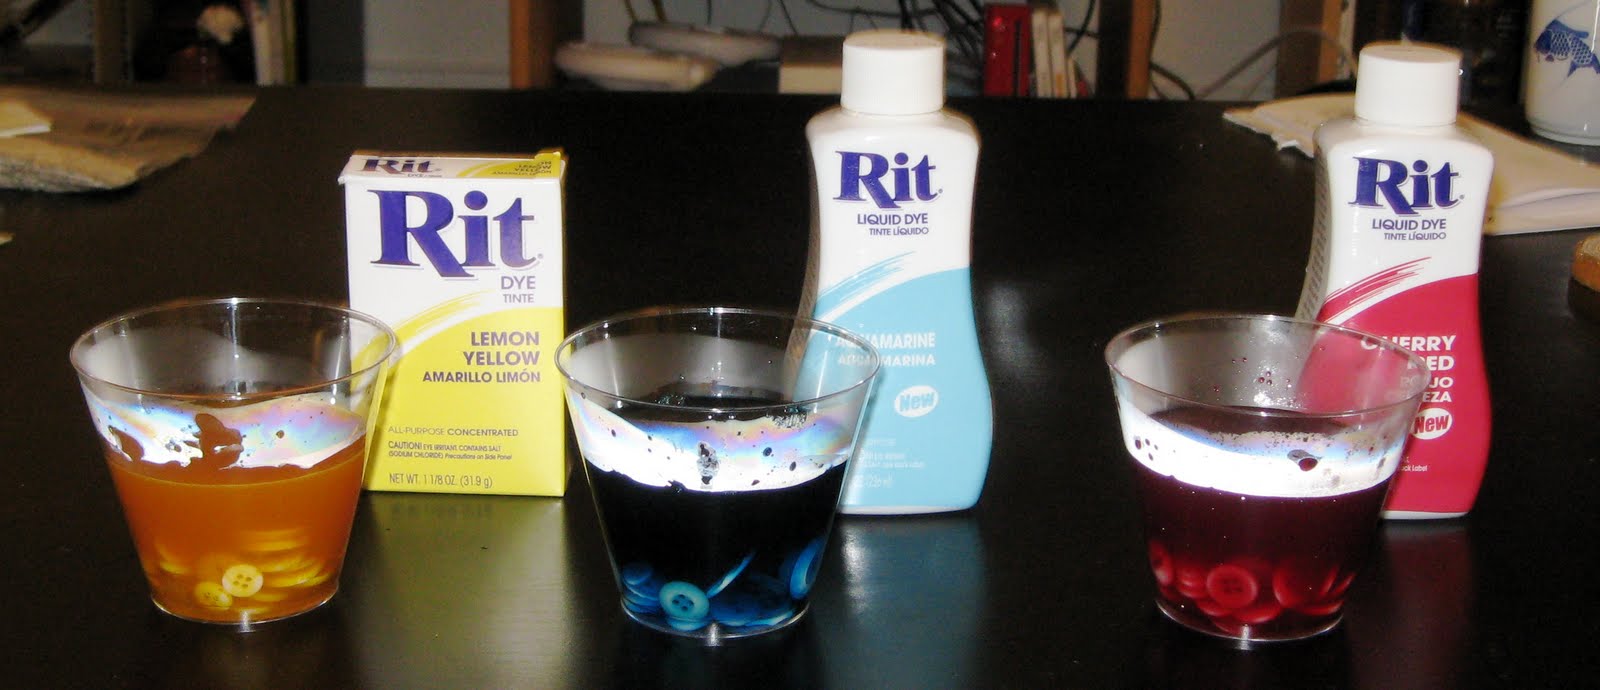
Rit Dye is known for its product's ability to color fabric. A lesser-known use for the dye is to color buttons; that's right: buttons. How convenient for little ol' me who recently acquired this giant mason jar of more buttons than I know what to do with. The process is incredibly easy; it's a matter of combining hot water, dye, and buttons. The website provides exact measurements; but I adjusted the amounts as I went.
The box is a powder dye which is far more concentrated than the liquid, so it requires less to achieve the desired color.

I only dyed a small amount of buttons this time around. And, I used only plastic cups and tools (spoons to fetch the buttons) which I didn't mind throwing away after I was done.

Voila! They are more pastel than I initially desired - very Easter-y. The buttons are beautiful. All the different cracks and scratches resulted in various shades of saturation. These three are my favorite:

All in all, the whole project took about 20 minutes. My buttons are now residing in the bottom of a wine carafe, surrounding some glass-blown yellow roses.
I only dyed a small amount of buttons this time around. And, I used only plastic cups and tools (spoons to fetch the buttons) which I didn't mind throwing away after I was done.
Voila! They are more pastel than I initially desired - very Easter-y. The buttons are beautiful. All the different cracks and scratches resulted in various shades of saturation. These three are my favorite:
All in all, the whole project took about 20 minutes. My buttons are now residing in the bottom of a wine carafe, surrounding some glass-blown yellow roses.
Wednesday, July 6, 2011
Paper Hearts
As the post below states, Simon and I are engaged! yay!! He proposed on our 5 year anniversary and the ring could not be more beautiful. I am happy beyond belief : )
We're going to do a long engagement, hopefully getting married sometime in Spring 2013 - which is great, because I would love the wedding to be mostly DIY; and two years gives me plenty of time to try out some crafts.
Mostly, I'd like to tie in some vintage books in to the overall decor of the wedding. One idea I've had is to punch out paper hearts and scatter them around whatever we end up using as centerpieces. And what luck! Martha Stewart makes a heart-shaped paper punch!
Super easy and surprisingly entertaining to use. The little heart shaped punch comes in two pieces, a base and a punch, in between which you place the paper. Each piece has magnets which attract each other to prevent the paper from slipping or moving during the punching process.

The intended purpose of the punch is to make a negative design on the paper to be used - which is why it comes with a small border of dots. I, however, am just saving the would-be trash...and vacuuming up all the little dots.

See! beautiful! I have the amount of about 1/3 of a sandwich bag right now. I love the way they look, and it makes for a pleasant craft while watching TV. I hope to fill the sandwich bag and use them in the wedding in one way or another.

* I am using an old copy of my favorite text - Jane Eyre - of which I have numerous editions. It's sort of a twisted and dark love story, so the text on the hearts is certainly not gushymushysquishyloveydovey text.
We're going to do a long engagement, hopefully getting married sometime in Spring 2013 - which is great, because I would love the wedding to be mostly DIY; and two years gives me plenty of time to try out some crafts.
Mostly, I'd like to tie in some vintage books in to the overall decor of the wedding. One idea I've had is to punch out paper hearts and scatter them around whatever we end up using as centerpieces. And what luck! Martha Stewart makes a heart-shaped paper punch!
Super easy and surprisingly entertaining to use. The little heart shaped punch comes in two pieces, a base and a punch, in between which you place the paper. Each piece has magnets which attract each other to prevent the paper from slipping or moving during the punching process.
The intended purpose of the punch is to make a negative design on the paper to be used - which is why it comes with a small border of dots. I, however, am just saving the would-be trash...and vacuuming up all the little dots.
See! beautiful! I have the amount of about 1/3 of a sandwich bag right now. I love the way they look, and it makes for a pleasant craft while watching TV. I hope to fill the sandwich bag and use them in the wedding in one way or another.
* I am using an old copy of my favorite text - Jane Eyre - of which I have numerous editions. It's sort of a twisted and dark love story, so the text on the hearts is certainly not gushymushysquishyloveydovey text.
Subscribe to:
Posts (Atom)